Here are my final words (well, until I get a new batch of eggs...):
Don't try making these. You're better off just buying them.
Or, if you're slightly compulsive and delusional anyway (like myself), then be prepared to suffer... and not do anything else for the next week or so. This macaron-making adventure is consuming my life and destroying my self-esteem. I can only say: I am obsessed.
It all began with my chocolate challenge. I wanted to make chocolate macarons. Then, I thought, maybe I'll just start with the basics, the plain almond-sugar version. C'mon, let's be honest now. Haven't you ever looked at or bitten into one of these heavenly little delights and thought to yourself "Ooo, they are so pretty but why are they so expensive? I mean how hard could they be to make?" Ha. HA! Evil little bastards.
I can hear the voices of numerous other ardent bakers who have long suffered my current fate before their glorious moment of victory: "Old egg whites! Use new egg whites! One tray! Two trays! Italian meringue! French meringue! Stiff peaks, soft peaks! Closed oven! Opened oven! Slightly opened oven! Ribbons! Bands! Lava! High speed my friend! Low speed my friend! It has to be shiny! It can't be liquid! Don't overfold! It has to flow like lava from Mount Hapinapanui! Dry them before baking! Don't dry them - just stick them straight into the oven. They need to have feet...le pied - that's what makes a REAL macaron! It's all about the macaronnage!" OMFG.
Yes, the macaronnage. The French know all about it... The beautiful and magical (kind of like a unicorn) yet strangely unattainable moment that can only be captured with the precise balance between mixing the almond meal into the meringue and creating the exact amount of air bubbles without leaving the mixture overly folded. (I just shot myself in the head with an imaginary bullet.) And those damn little 'pieds'. I've made about four batches now. (If you were wondering where I've disappeared to and why I haven't posted in so long, this is why.) My cousin thinks I'm insane because I keep yelling "Where are the feet? There's no feet!" while staring at my oven in despair. Even my mother is slightly concerned. ("How many more batches of these do we have to eat? What ARE you trying to make?")
As with all obsessions, I have reached the point of no return. It is too late to give up. I will not stop. I will not rest until I bake them with feet.
I need more eggs.
UPCOMING CHALLENGE:
1. Macarons...Part II  [on hold]
 [on hold]
2. Caramel. :P
3. Cooking on a budget: £30 a week
Showing posts with label challenge. Show all posts
Showing posts with label challenge. Show all posts
December 26, 2010

December 2, 2010
Mmm...cake.
The last one I made disappeared in a couple of days. I was craving some today so I baked myself a mini 5" version. Instead of using buttermilk (which is really too fatty), I used vanilla yogurt - much healthier! It still tasted super moist and delicious. ;)


November 27, 2010
Bring On The Thunderbolts!
I bought four blocks of unsalted butter today. For some reason, butter seemed essential in prepping for the upcoming winter months. I know it's not even December yet but the chilly weather has subconsciously made me want to use my oven more often. Plus, I've recently realized the monotonous drone from my electric mixer is actually quite soothing.
I made some mocha chocolate shortbread - the dough shaped into lightning bolts - last week for the opening night of the new Harry Potter movie. Coffee and chocolate: another match made in heaven... More chocolate goodness to come!


I made some mocha chocolate shortbread - the dough shaped into lightning bolts - last week for the opening night of the new Harry Potter movie. Coffee and chocolate: another match made in heaven... More chocolate goodness to come!


October 17, 2010
West Coast: Day 15 - Sea Urchin
We visited Vancouver's Fisherman's Wharf today.
The smell of the salty sea and fresh seafood was quite refreshing.
I guess that's the advantage of living so close to the ocean - fresh seafood all the time...and so cheap.


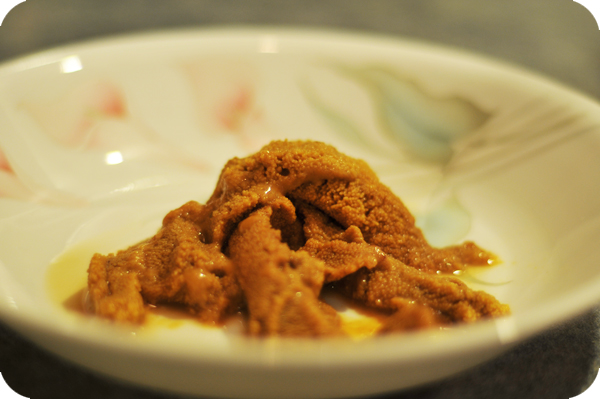
My aunt bought a live sea urchin for three dollars and forty cents. I've have never seen the inside of one and trust me, it's not a pretty sight. The porcupine-like shell can be cracked open with a pair of scissors and gloves. You only eat the roe which is yellow ochre in colour. My aunt said the ones off of the West Australian coast tasted better. I had a tiny bite of this one to compare to the one I tasted a couple years back at a Japanese restaurant. This one resembled the taste of lobster tomalley but raw. I'm personally not a big fan but it's a popular delicacy eaten as sashimi. But boy, it's one ugly little creature.

The smell of the salty sea and fresh seafood was quite refreshing.
I guess that's the advantage of living so close to the ocean - fresh seafood all the time...and so cheap.


My aunt bought a live sea urchin for three dollars and forty cents. I've have never seen the inside of one and trust me, it's not a pretty sight. The porcupine-like shell can be cracked open with a pair of scissors and gloves. You only eat the roe which is yellow ochre in colour. My aunt said the ones off of the West Australian coast tasted better. I had a tiny bite of this one to compare to the one I tasted a couple years back at a Japanese restaurant. This one resembled the taste of lobster tomalley but raw. I'm personally not a big fan but it's a popular delicacy eaten as sashimi. But boy, it's one ugly little creature.
September 25, 2010
Braised Ox Tongue
I'm back in Toronto living with my parents and my cousin. Cleaning the house, buying groceries, occasionally picking up my cousin from school, running on the elliptical, cooking meals for four people everyday - my past month has been dedicated to this routine.
In a week or so, my parents, my aunt & uncle and myself are embarking on a three-week trip to the Canadian (and American) west coast. My new challenge? To record as much food related activity as I possible can. 'Challenge' is definitely the right word to describe the above mentioned task for myself. Um...March 27th was my last real food post. That's almost six months ago - oops. (Boink on the head - I'm a terrible blogger.)
Last night was an adventure. Ox tongue. Bought from a Chinese supermarket, the black rough outer membrane was already removed, completely destroying my hope of doing my own mini-surgery. The stewing took about two and a half hours. The smell of herbs, spices (star anise, Sichuan peppers & peppercorns), an onion and a piece of cow muscle rocking out a stew in my slow cooker (the same cooker my very own mother used a couple months ago to make me loads of strange-tasting Chinese herbal medicine) and a can of beer lingered in the house for hours. Then I braised it for another two hours with carrots, tomatoes, mushrooms, garlic, more onions and some red wine. Half a bottle to be exact. What can I say, I love alcohol. The meat was really tender, almost like corned beef, but fatter; it'd make excellent sandwich meat.


In a week or so, my parents, my aunt & uncle and myself are embarking on a three-week trip to the Canadian (and American) west coast. My new challenge? To record as much food related activity as I possible can. 'Challenge' is definitely the right word to describe the above mentioned task for myself. Um...March 27th was my last real food post. That's almost six months ago - oops. (Boink on the head - I'm a terrible blogger.)
Last night was an adventure. Ox tongue. Bought from a Chinese supermarket, the black rough outer membrane was already removed, completely destroying my hope of doing my own mini-surgery. The stewing took about two and a half hours. The smell of herbs, spices (star anise, Sichuan peppers & peppercorns), an onion and a piece of cow muscle rocking out a stew in my slow cooker (the same cooker my very own mother used a couple months ago to make me loads of strange-tasting Chinese herbal medicine) and a can of beer lingered in the house for hours. Then I braised it for another two hours with carrots, tomatoes, mushrooms, garlic, more onions and some red wine. Half a bottle to be exact. What can I say, I love alcohol. The meat was really tender, almost like corned beef, but fatter; it'd make excellent sandwich meat.


March 25, 2010
Phyllo Log with Caramelized Apples
Probably the best advice that I can give is to not choose the wrong phyllo dough recipe. That sounds unbelievably simple (and yes, I'll admit it, slightly anti-climatic) but it's the dead honest truth.
Phyllo dough is not difficult to make. There must be some conspiracy out there trying to embed the concept into women's minds that making homemade phyllo dough may be the most strenuously terrifying experience (aside from childbirth I'm speculating) that they could possibly put themselves through. Yet women will have no hesitation spending hours and numerous you-had-better-spent-them-on-a-treadmill calories making three-tier chocolate cakes and 15-pound turkeys. Even lasagne takes more time and effort to make.
The second and almost-just-as-important advice is: When you think it's thin enough, it could probably be thinner. Yeah you will never be able to roll out the dough to factory-machinery thinness but you can sure try. And it will be worth it.
The third advice, work fast and with smaller chunks of dough. You don't want to phyllo to start drying up. Smaller chunks will allow you to push out the dough thinner without running out of room on your board.
Conclusion? Do not pick a recipe that calls for butter or lard-related substances in the dough. It's ok if you brush it on after, that's what you're supposed to do. No eggs either. Neither made a huge difference in the end result tastewise or texture wise and if it's not needed, why add the extra fat? Also, don't forget, keep rolling and be quick!
Oh a word of caution, not advice, just words from a klutzy me. Don't be an idiot and think that your (little) flour well/mountain/hole that you'd made can hold in ALL the liquid that you're about to pour into the centre. Chances are, the liquid will bulldoze its way through the flour and spill all over your kitchen countertop. Use a bowl or add the liquid a little bit at a time.
I will be trying a new recipe which only calls for flour, vinegar, olive oil, lemon juice and hot, hot water. Much healthier.


Phyllo dough is not difficult to make. There must be some conspiracy out there trying to embed the concept into women's minds that making homemade phyllo dough may be the most strenuously terrifying experience (aside from childbirth I'm speculating) that they could possibly put themselves through. Yet women will have no hesitation spending hours and numerous you-had-better-spent-them-on-a-treadmill calories making three-tier chocolate cakes and 15-pound turkeys. Even lasagne takes more time and effort to make.
The second and almost-just-as-important advice is: When you think it's thin enough, it could probably be thinner. Yeah you will never be able to roll out the dough to factory-machinery thinness but you can sure try. And it will be worth it.
The third advice, work fast and with smaller chunks of dough. You don't want to phyllo to start drying up. Smaller chunks will allow you to push out the dough thinner without running out of room on your board.
Conclusion? Do not pick a recipe that calls for butter or lard-related substances in the dough. It's ok if you brush it on after, that's what you're supposed to do. No eggs either. Neither made a huge difference in the end result tastewise or texture wise and if it's not needed, why add the extra fat? Also, don't forget, keep rolling and be quick!
Oh a word of caution, not advice, just words from a klutzy me. Don't be an idiot and think that your (little) flour well/mountain/hole that you'd made can hold in ALL the liquid that you're about to pour into the centre. Chances are, the liquid will bulldoze its way through the flour and spill all over your kitchen countertop. Use a bowl or add the liquid a little bit at a time.
I will be trying a new recipe which only calls for flour, vinegar, olive oil, lemon juice and hot, hot water. Much healthier.


March 16, 2010
Stick it to...
Why do I do these things to myself? If you read my new upcoming challenge, you'd probably think the same thing. Yes, I'm planning on making my own phyllo dough and sheets. Just typing about the challenge makes me palpitate. Why can't I be like any other normal person and pick up a pack of premade frozen ones from the closest supermarket? Why do I find kneading and rolling and re-kneading and re-rolling out pastry until they are tissue paper thin actually exciting?
I just don't trust it. "It" being "The Man".
What does he put in my phyllo dough? I don't know.
Can I ever trust "The Man" to look out for me? Most likely not.
Why does "The Man" deceive me to believing that a cute, squeaky white dough boy with a fake bellybutton is in charge of overseeing the production of my premade baking products or that frozen dinners are actually made with my lifestyle in their mind? To rob me of my money and health.
This is the same reason why I make my own pie crust and almost everything from scratch if I possibly can (within the limits of my present kitchen - ie: my mother). "The Man" is out there. Fellow health-lovers, agree with me, we must not give in...
So begins my new challenge.
I just don't trust it. "It" being "The Man".
What does he put in my phyllo dough? I don't know.
Can I ever trust "The Man" to look out for me? Most likely not.
Why does "The Man" deceive me to believing that a cute, squeaky white dough boy with a fake bellybutton is in charge of overseeing the production of my premade baking products or that frozen dinners are actually made with my lifestyle in their mind? To rob me of my money and health.
This is the same reason why I make my own pie crust and almost everything from scratch if I possibly can (within the limits of my present kitchen - ie: my mother). "The Man" is out there. Fellow health-lovers, agree with me, we must not give in...
So begins my new challenge.
February 3, 2010
Poached Eggs
Tasty? Yes. Terrified to make one? Uh-huh. I could never get my poached eggs to look like the perfect smooth ones they serve at Cora's. Buy an egg poacher? That doesn't satisfy me. I'm curious - people poached eggs for centuries before the "egg poacher-scooper-hanging-thingy" was manufactured. How did they do it?
Julia Childs suggests to poke a small hole in the shell with a pin and boil the egg for 10 seconds before cracking it into simmering water. Too risque. Another wise woman suggested vinegar and making a vortex out of the water. Been there, failed that. Now here's an idea I found, wrap your egg in microwavable plastic wrap forming a pouch and boil in water. No mess - apparently. Hmm... Finally, pour your egg in a ladle then pour hot water over it. Perhaps?
I tried the last two methods. Plastic wrap is perfect if you don't mind the wrinkles. 100% mess free. Egg does not stick to the wrap. Isn't that something nice to know? But the wrinkles would bother me if I have to serve this at a brunch with guests. Method two gave me the perfect round poached egg. Although I think it would be wise to add a drop of oil in the ladle before pouring the egg in. This method takes more patience. You can't submerge the ladel into the water until the egg has entirely set...unless the whole thing turns ugly.
I had this for dinner last night: topped it with cheese, paprika and dill weed. I didn't have English muffins but the whole wheat bread wasn't bad. Now I can enjoy poached eggs whenever I want - poached to perfection every time.


Julia Childs suggests to poke a small hole in the shell with a pin and boil the egg for 10 seconds before cracking it into simmering water. Too risque. Another wise woman suggested vinegar and making a vortex out of the water. Been there, failed that. Now here's an idea I found, wrap your egg in microwavable plastic wrap forming a pouch and boil in water. No mess - apparently. Hmm... Finally, pour your egg in a ladle then pour hot water over it. Perhaps?
I tried the last two methods. Plastic wrap is perfect if you don't mind the wrinkles. 100% mess free. Egg does not stick to the wrap. Isn't that something nice to know? But the wrinkles would bother me if I have to serve this at a brunch with guests. Method two gave me the perfect round poached egg. Although I think it would be wise to add a drop of oil in the ladle before pouring the egg in. This method takes more patience. You can't submerge the ladel into the water until the egg has entirely set...unless the whole thing turns ugly.
I had this for dinner last night: topped it with cheese, paprika and dill weed. I didn't have English muffins but the whole wheat bread wasn't bad. Now I can enjoy poached eggs whenever I want - poached to perfection every time.


February 1, 2010
Challenge: Butter Chicken (Part 2)

Due to time restraints, I definitely made some questionable choices that affected the end result.
#1: I cooked the chicken in the sauce on the stove. They were supposed to be baked first. The meat got pretty tough. Letting it simmer in the sauce in a pan made it overcooked; all the juices ran out into the sauce instead of sealed in when baked. So having marinating the chicken in the yogurt (which makes the meat tender) was a waste of time.
#2: For this dish, pureeing tomatoes with your own blender is not the same as a can of tomato sauce. Fresh tomatoes were watery, sour and not concentrated enough. The dish did not have the bright reddish colour that I love about butter chicken. More importantly, I had to add extra sugar to get rid of the sourness. Plus, when I mixed it with the yogurt mixture, the water and the pureed fibre separated in the pan, making the butter chicken appear kind of nasty and grainy...instead of thick and smooth.
Considering it as my first attempt at Indian cooking, it turned out pretty well. It was quite flavourful. I'd probably make it again but not too soon, especially knowing how much butter and whipping cream was used!
January 30, 2010
Challenge: Butter Chicken (Part 1)
I probably could have chosen a dish with half the number of ingredients to make for my first ever challenge. However, it is The Life Cooking Project after all so no whimpy tasks will be allowed to waste space on this blog. Having said that, let's get right to it!

First we sieved the plain yogurt with a cheesecloth to drain all the unnecessary water out. That took about an hour.

Meg (yes I did have a helper on this one...I was in a rush to get the first part completed in time for our dinner date with friends) was responsible for mixing all the spices together which smelled fragrant and simply DELICIOUS!!! We cheated a little and ended up using a premixed Garam Marasla to save a bit of time.

I, in the mean time, minced garlic and ginger (that's what the bigger cubes in the spices mixture are).

While the yogurt was still draining, Meg cleaned and cubed the chicken breasts while I chopped onions and diced tomatoes. The first mixture of spices was then added to the onions to cook for a good 10 minutes so they really soak in the flavour. My kitchen smelled like an Indian restaurant at this point and my mother popped her head in, clearly loving the intense aroma.


Subscribe to:
Posts (Atom)